 If Facebook were a spy novel, the terms of service would be enigmatic documents stored on microfilm and hidden in plain sight in some local library. The features are like James Bond’s clever gadgets, but are never at hand when needed and lack any meaningful instructions. How is one to unlock these mysteries and reach that magical transmitter that can carry your message to those 360 million users? Facebook fan pages are incredibly useful and effective marketing mechanisms, but it can be frustratingly unapparent where to start, what to do, and how to do it. Lucky for you, I have the secret decoder ring you’ve been looking for.
Why Bother?
Before decoding these mysteries, let’s talk about why anyone should bother in the first place. I already mentioned fan pages specifically, and there are three major advantages to implementing fan pages over groups and personal pages:
- Link Juice – Fan pages are public, whereas your personal profile and its updates are protected, unless you’ve made everything public in your privacy settings. But even if you’ve done this, the interactions with others is mostly protected, which means that none of the content is indexed by search engines. The pages contain links back to your site, which create link juice.
- Branding – Anyone can create a fan page in your name, whether it’s an employee, a customer, or a competitor. Even if your company name is a registered trademark, you do not want to be spending your time firing bow-shots and dealing with Facebook support. Grab your company’s identity so you are in control and do it today.
- Analytics – Facebook calls them “Insights” and you can only get them with fan pages. They give some basic data to do some trending and metric measurement.
In addition to these benefits over Facebook groups and personal pages, I wrote another blog post that contains “7 Reasons to Include Facebook In Your Marketing.”
The Ownership Dilemma
In order to create a fan page, you need to be logged in to a Facebook account. But whose account and what kind? Well, that’s the dilemma. The account that creates the fan page becomes the de facto owner. Worse yet, the owner of a fan page cannot be changed (at least not right now). Therefore, it’s not really desirable to create a fan page using your own personal Facebook account. Therefore, Facebook does offer the option of creating a “business account” which has a number of limitations when compared to a standard, personal account. Problem solved, right? As it turns out, not so much if you read the dreaded Terms of Service for business accounts:
You may create a business account if you don’t already have a standard Facebook account.
…
Please be aware that managing multiple accounts is a serious violation of Facebook’s Terms of Use. If we determine that an individual has more than one account, we reserve the right to terminate all of their accounts.
…
Maintaining multiple accounts, regardless of the purpose, is a violation of Facebook’s Terms of Use. If you already have a personal account, then we cannot allow you to create business accounts for any reason. You can manage all the Pages and Socials Ads that you create on your personal account.Please keep in mind that the fans of any of the Pages you administer will not have visibility or access to your personal account or profile. Any actions that you take as a Page administrator on your Page will show the Page’s name as the actor and not your personal name.
Despite the fact that “we reserve the right” does not necessarily mean they will, these warnings are pretty stark and I am therefore reluctant to advise anything other than creating your fan page from your own personal account, as undesirable as that is. It’s a bit of a mystery why Facebook would offer such a thing as a business account and then virtually assure there is no way to use it without violating their terms of service, but such is life for the time being.
Getting Started
Facebook makes it a little tricky to get the ball rolling, so here’s a quick start guide to get you going:
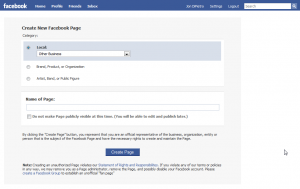
- Go to the Create New Facebook Page link (http://www.facebook.com/pages/create.php).
- Select the type of page you want to create and give it a name. You can choose to keep it private if you’re not quite ready to make it visible to the world. This is a good option if you’re just trying to protect your brand.

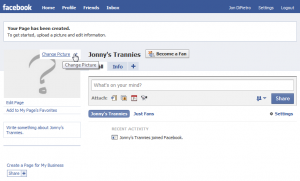
- Set up the basic information. Upload a picture (hover your cursor over the picture area and click “change picture”), and make sure it’s square so that Facebook doesn’t auto-crop it. Click the link under the picture that says “Write something about …” and put in a brief description of your page.

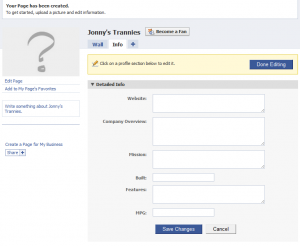
- Click on the “Info” tab and then the “Edit Information” link. Be sure to enter a web site and company description at the very least!

- Click on the “Share” button in the left margin and invite all of your friends who may be interested.
- Promote your fan page on other web sites by creating a Fan Box. This is another frustratingly difficult link to find. You can begin from the Facebook Widgets page. There are two options; Fan Boxes and Page Badges. You can play around the settings for each to configure it as you like. When you’re done, save it and then you can copy and paste the code in to your web page.

Then, go forth and update! One word of advice; don’t turn your fan page into a content Doppelgänger. Try to understand how your Facebook audience wants to interact with you and what sort of content and update frequency is palatable to them. If you’re not sure, ask them. If they became a fan, they should be happy to offer their opinion on what they want to see from you. Don’t simply redistribute press releases or link your Twitter stream to your fan page. Each social media channel has its own character and user preferences and you need to understand and respect them.

