The biggest challenge (arguably) with content marketing is finding the time. Although we know how valuable it is and what a great investment content is for our marketing efforts, let’s face it: We can always find a higher short term business priority. And so the blog post, ebook and webinar are perpetually pushed out until that magical day when 90% of all work takes place; tomorrow.
But when we finally do get to that day and start to put in the work, it helps to do so with maximum efficiency. In my opinion, this means two things. First, take as little time as possible. Having a plan/roadmap/template/checklist is useful in this regard. Second, get as much benefit from your work product as possible. Repurposing your content is the key to maximum return.
In this post, I’m going to show you how to use PowerPoint as the linchpin in a process that can get you maximum benefit with minimum investment.
Content Marketing With PowerPoint
[nonmember]The Inbound Marketing Inquirer is a weekly premium article that’s free to view for members. To read the remainder of this article, create a free account now:
[register_inquirers (free)][/nonmember]
[ismember]
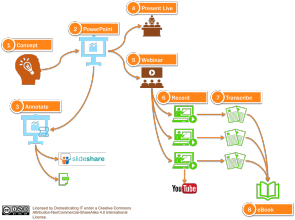
Let’s go over each of the steps in the graphic above (click on the image to open a full-sized version).
Step 1: Concept
 Obviously, the first step is to come up with a topic. If you’re having trouble with this step, check out my article about how to come up with 75 blog ideas in 5 minutes. Once you have your idea, create an outline that will serve as the roadmap for developing your presentation. When developing your outline, think about taking your audience on a journey. A presentation should always have a goal of transforming the viewer, so think of your outline as a way to get from point A to point B. Where is your audience now? How will they be different after seeing your presentation? What are the basic steps to get them from start to finish?
Step 2: Build Your PowerPoint Deck
 Once your outline is complete, it’s time to go ahead and create your PowerPoint slide deck. Obviously, it’s important to do this well! I began this post by talking about efficiency and creating content quickly. However, do not sacrifice on quality. Be sure to follow best practices for presentation design. Many books have been written on steps one and two, so I can’t do them justice in this single blog post. However, for more tips on how to create a great presentation, check out Presentation Zen and Now.
Step 3: Annotate Your Presentation
 If you’ve done a good job creating your slide deck, then it should have little or no text on it. Otherwise, you haven’t built a presentation. You’ve built what Garr Reynolds calls a “slideument,” which is an unholy marriage of a slide and a document. A good slide deck should be completely useless without its presenter. Otherwise, your audience will be reading your slides instead of listening to you.
Therefore, this next step is to create an alternate version of your presentation that can be viewed and understood on its own. This is what I call the annotated version of the presentation. The goal is to create a new version of the presentation that is optimized for viewing on Slideshare. To do this, you’ll need to add text to your slides in order to fully convey your message. Also, it’s frequently necessary to break single slides with animations into multiple, individual slides (because Slideshare does not support builds or animations).
As an added bonus, this version can also be saved as a PDF and can be used to email or as a “leave behind.”
Step 4: Present Live
 Live presenting is, in my opinion, a vastly underutilized marketing tool. My entire inbound marketing consultancy is the result of public speaking. It’s a great way to spread brand awareness and to position yourself as a thought leader in your industry. If you’re just getting started with public speaking, you can get started at small, local events like Chamber of Commerce lunches, Rotary Club meetings, etc. Also, keep an eye out for local expositions and conferences. These events are typically very hungry for presenters and represent great opportunities. Also, check with any member associations in your profession. These are a great place to get started with public speaking, as it’s usually a friendly audience of your peers – many of whom you already know and feel comfortable with.
When you do get a speaking opportunity, be prepared to make the most of it. I like to tell my audience that an annotated version of the presentation is already posted online and provide them with the URL. This way, they don’t feel like they have to write down every single idea since they know it’s available to them online. Write up a blog post before your presentation and embed the annotated Slideshare version of your presentation in it. Then, use a URL shortener like bit.ly to offer to your audience as a convenience.
Step 5: Host a Webinar
 Steps 4 and 5 are interchangeable. In fact, if you’re not accustomed to public speaking it may be advisable to do a few webinars first. It gives you some practice without the fear factor of standing on a stage in front of a room full of people staring at you. But the real power in this step is the lead collection. Webinars are a great way to build your audience and grow your email database!
The other advantage of hosting a webinar using your PowerPoint deck is that it enables step #6…
Step 6: Record Your Webinar
 Recorded webinars (or live presentations) are an extremely valuable form of content. There are many, many uses for them! First, they can be uploaded to YouTube – also known as the world’s second-largest search engine. If the webinar is too long, consider breaking the recording into shorter videos. By default, YouTube limits the length of videos to 10 minutes, though it’s quite easy to create a channel that allows for longer run times.
You can also use these to host pre-recorded webinars in the future. It’s a great way to leverage your efforts and continually grow your email subscriber database without additional time or effort spent.
Step 7: Transcribe
 Once you have a recording of your live presentation or webinar, there are online services that will create transcripts of audio or video at quite a reasonable cost. Speechpad is the service that Moz uses for their Whiteboard Friday series. The cost is $1.00 per minute.
There are two reasons to transcribe your presentation recordings. The first is for SEO value. Once you have a complete set of assets – annotated presentation, video recording and transcript – you can publish a powerhouse blog post containing all of those embedded assets. If the only content in the post is the embedded presentation and video, there won’t be any text for the search engines to index. Providing the transcript fixes that.
The second reason to create the transcripts is that it enables a shortcut to step #8…
Step 8: eBook
 The Holy Grail of content marketing. The of the hill. The undisputed heavyweight champion of the marketing world. The eBook. It spreads brand awareness. It generates back links and social shares. But most of all, it generates leads. Once you have your presentation recording transcribed, you can combine the text with the images from your presentation in order to create an eBook. It won’t be a simple copy and paste, since verbal communication tends to be delivered differently than written. But it’s likely going to be shorter than writing the book from scratch.
[/ismember]
Looking Back…
Phew! When I started writing this article, I thought it was going to be pretty short and sweet. In fact, it turned out to be something that I think deserves its own content marketing campaign. I think I’ll eat my own dog food and turn this concept into its own PowerPoint content marketing powerhouse. I can easily see how each of these 8 steps could be expanded into their own individual blog articles and then stitched together as a complete ebook. The first step, of course, will be to create that PowerPoint deck. And then it’s off to the races!
